Ultrasonic Testing for Crack Detection: A Comprehensive Guide Using Magnaflux Sonotech Products
Share
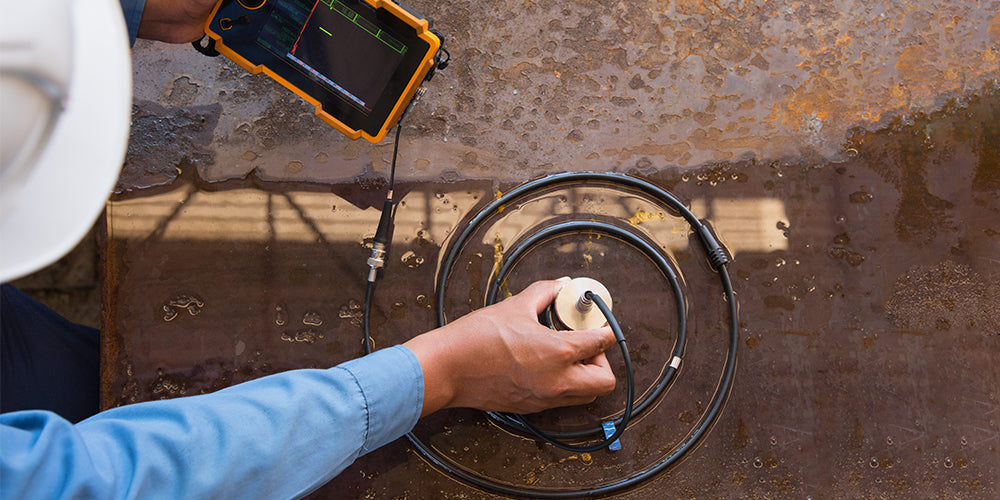
Ultrasonic testing (UT) remains one of the most reliable and versatile non-destructive testing methods for detecting internal and surface-breaking cracks in critical components. When performed correctly with high-quality couplants, UT can reveal flaws that other inspection methods might miss. This guide walks you through the essential steps of performing ultrasonic crack detection using industry-leading Magnaflux Sonotech products.
Understanding Ultrasonic Testing for Crack Detection
Ultrasonic testing works by transmitting high-frequency sound waves through a material using a transducer. When these sound waves encounter a discontinuity such as a crack, void, or inclusion, they reflect back to the transducer. By analyzing the time it takes for the echo to return and the amplitude of the signal, technicians can determine the location, size, and nature of the flaw.
The success of ultrasonic inspection depends heavily on the efficient transmission of sound energy from the transducer into the test material—and that's where couplants play a critical role.
The Critical Role of Couplants
Air gaps between the transducer and the test surface will block ultrasonic waves from entering the material. Couplants eliminate these air pockets by providing a medium through which sound waves can efficiently travel. Magnaflux's Sonotech line offers precisely formulated couplants designed to maximize sound transmission and deliver reliable inspection results.
Step-by-Step Ultrasonic Crack Detection Procedure
1. Surface Preparation
Begin with proper surface preparation. The test surface should be clean, dry, and free from loose scale, dirt, oil, or paint that could interfere with coupling. For rough surfaces, light grinding or wire brushing may be necessary to achieve adequate contact.
2. Select the Appropriate Couplant
Choose your Sonotech couplant based on your specific testing conditions:
For General-Purpose Applications:
- Sonotrace 30 - This medium-viscosity gel is ideal for standard flaw detection and thickness gauging. It's glycerin-free and meets specifications for applications requiring minimum halogens, sulfur, and low melting point metals—making it particularly suitable for nuclear power industry inspections.
For Superior Performance:
- Ultragel II - The industry standard for high-performance ultrasonic inspection. This premium couplant delivers exceptional acoustic coupling and is trusted for critical flaw detection applications where maximum sensitivity is required.
For Environmentally Sensitive Operations:
- Soundsafe - A high-performance, environmentally benign couplant that offers outstanding performance while providing excellent corrosion protection. Its thixotropic properties make it ideal for overhead and vertical surface inspections, as it stays in place without excessive dripping.
For High-Temperature Applications:
- Sono 600 - This versatile couplant maintains its coupling properties across a wide temperature range, making it perfect for inspecting hot surfaces in petrochemical and power generation facilities.
For Specialized Applications:
- UT-X Powder - A cost-effective powder couplant that can be mixed on-site. Excellent for field applications on corroded surfaces, structural steel, and ship plate where ferrous corrosion inhibition is needed.
3. Apply the Couplant
Apply a liberal amount of your selected Sonotech couplant to either the transducer face or the test surface. For vertical or overhead surfaces, gel-type couplants like Ultragel II or Soundsafe are preferable as they resist dripping. Ensure complete coverage without air bubbles.
4. Select the Proper Transducer
Choose a transducer with the appropriate frequency and beam angle:
- Higher frequencies (5-10 MHz) provide better resolution for detecting small cracks near the surface
- Lower frequencies (1-2.25 MHz) offer deeper penetration for thick sections
- Angle beam transducers are essential for detecting cracks perpendicular to the surface using shear waves
5. Calibration
Before inspection, calibrate your ultrasonic instrument using a reference standard with known reflectors at specific depths. This ensures accurate flaw sizing and depth determination. Adjust gain settings and time-base calibration according to your procedure specifications.
6. Perform the Inspection
Place the transducer on the couplant-covered surface with moderate pressure. Avoid excessive pressure that could squeeze out the couplant. Move the transducer systematically across the inspection area using one of these scan patterns:
- Raster Scanning: Moving in parallel lines with overlap
- Orbital Scanning: Rotating the transducer while moving across the surface
- Grid Scanning: Following predetermined grid lines for documentation
Monitor the display screen for:
- Amplitude drops in the back wall echo (indicating sound attenuation by a flaw)
- Intermediate signals between the initial pulse and back wall echo (indicating internal discontinuities)
- Changes in signal characteristics that may indicate crack-like defects
7. Flaw Evaluation and Sizing
When a crack indication is detected:
- Mark the location on the test surface
- Maximize the signal amplitude by adjusting transducer position and angle
- Measure the flaw's depth using time-of-flight calculations
- Determine the flaw's length by scanning along its orientation
- Assess the flaw's through-wall dimension using amplitude analysis or multiple probe positions
- Document all findings with screen captures and written records
8. Post-Inspection Cleanup
After completing the inspection, clean excess couplant from both the component and transducer. Most Sonotech couplants are water-soluble and can be removed easily with clean water or approved cleaning agents. Proper cleanup prevents residue buildup that could affect future inspections or cause corrosion.
Best Practices for Crack Detection
Optimize Your Technique:
- Maintain consistent transducer pressure and coupling throughout the scan
- Use systematic scan patterns with adequate overlap (typically 10-15%)
- Re-apply couplant as needed—don't let it dry out during inspection
- Verify coupling quality by monitoring the front surface echo or back wall echo amplitude
Environmental Considerations:
- Store couplants at recommended temperatures to maintain proper viscosity
- For cold environments, allow couplants to reach working temperature before use
- In hot conditions, choose high-temperature formulations like Sono 600
- Protect couplants from contamination by keeping containers sealed
Quality Assurance:
- Perform daily instrument checks using reference standards
- Verify couplant performance periodically by comparing signal amplitude
- Document environmental conditions that may affect inspection results
- Follow written procedures that specify equipment, techniques, and acceptance criteria
Why Choose Magnaflux Sonotech Couplants?
Magnaflux Sonotech couplants are specifically engineered for NDT applications, offering:
- Consistent acoustic properties for reliable, repeatable results
- Wide range of formulations to meet diverse application requirements
- Compliance with industry specifications including nuclear, aerospace, and petrochemical standards
- Technical support from experienced NDT professionals
- Multiple packaging options from convenient 4 oz bottles to economical gallon containers and bulk sizes
Conclusion
Successful ultrasonic crack detection requires the right combination of equipment, technique, and materials. By following these procedures and using quality Sonotech couplants matched to your specific application, you can achieve reliable crack detection that helps ensure component integrity and safety.
Whether you're inspecting welds, forgings, castings, or in-service components, the Magnaflux Sonotech product line provides the coupling performance needed for confident flaw detection. Visit NDT Supplies to explore the complete range of Sonotech ultrasonic testing products and find the perfect couplant for your application.